Monday, December 10, 2012

Panko Crusted Mashed Potatoes


I know, I've pinned things like crazy, just haven't done anything or had time to tell about it. I've cooked a few things. Every time I plan my menu, I add something new. Like these. These potatoes were super, duper good! Serious!

Here's the recipe, from Allrecipes:

INGREDIENTS:
2 cups chilled mashed potatoes
2 eggs, slightly beaten, (separate bowls)
2 tablespoons chopped onion
1/2 tablespoon black pepper
1/2 cup flour for dredging
1 cup Kikkoman Panko Bread Crumbs
3 tablespoons vegetable oil for pan frying
DIRECTIONS:
1. In a medium bowl, combine potatoes, one egg, onion and black pepper. Divide potato mixture into 8 equal portions. Use your hands to form 1/2 inch thick patties. Dredge patties in flour, then in egg and coat with Panko Bread Crumbs. Meanwhile heat vegetable oil in a large skillet over medium high heat. Add potato patties to the hot oil. Cook until well browned, turn with a spatula and brown on the other side.

8 servings

The only alterations I made was the egg. I didn't mix egg into my mixture after reading some reviews. I did use an egg to dip the potatoes in.

You can find the original recipe HERE!

Monday, July 30, 2012

Patty Melts

(photo from Saveur Magazine online)


I was scrolling through Pinterest one day, imagine that lol, and Braden (one of my 10 year old twins) was walking by and saw this pic of the Patty Melt and said "That looks good" so of course I pinned it because I'm all about pinning stuff that my kids might like, and I had to agree, it did look good. I've never had a Patty Melt before but it looked like something worth trying and that it was!

Here's the recipe:


1 1⁄2 lbs. ground beef
Kosher salt and freshly
ground black pepper, to taste
5 tbsp. canola oil
2 yellow onions, halved and thinly sliced
12 slices rye bread
12 thin slices cheddar, swiss,
or american cheese
8 tbsp. unsalted butter, softened

1. Season the beef with salt and pepper. Divide meat into six 1⁄4"-thick patties that are slightly wider and longer than the bread.

2. Heat 2 tbsp. oil in a 12" cast-iron skillet over medium-high heat. Add the onions, season with salt and pepper, and cook, stirring occasionally, until softened and browned, about 12 minutes. Transfer the onions to a bowl; wipe out skillet. Working in 3 batches, heat 1 tbsp. oil in skillet over high heat. Add 2 burger patties; cook, flipping once, until well browned, about 4 minutes total. Transfer patties to a plate.

3. Top each of 6 bread slices with some of the onions, a cheese slice, and a burger patty. Top each burger with a cheese slice and a piece of bread. Using a table knife, spread butter over the top and bottom of each sandwich.

4. Heat a 12" nonstick skillet over medium heat. Working in 3 batches, cook sandwiches, flipping once, until golden brown and hot, about 6 minutes.

And here's how I did it...I mixed the ground beef like it said to and cooked on my griddle. I separately cooked my onions up in a small skillet and I buttered my sliced rye break. Once my patties were cooked, I sat it on the un-buttered slice of rye and topped that with the cooked onions and then topped that with the cheese (I used American because I knew my kids would like that) then I topped that with the other slice of buttered rye, buttered side up and cooked it on the griddle like a grilled cheese. Oh these were so yummy and my kids and husband all liked them. I seriously could have ate 2 because I thought they were that good!

I took pictures of mine but they turned out really sucky! (the pictures, not the sammies!)

Linking once again to

Monday, July 23, 2012

Bacon. Egg and Cheese Pull-a-Parts


Weekend mornings we usually have a big breakfast. It is, after-all, the only time of the week that we are all together in the morning to eat, or usually anyway. I'm always looking for something new to try that everyone will like and this seemed like it would do the job, I mean it has bacon, biscuits, cheese and eggs...who doesn't like that stuff?

Sooo, tried it on Sunday and it was purty delish! The boys really liked it a lot and had seconds even.

Here's the recipe:


Ingredients

1 egg
2 tbsp milk
1 (16.3-oz.) can Pillsbury® Grands!® Flaky Layers Refrigerated Original Biscuits
1 (2.1-oz.) pkg. precooked bacon, cut into 1/2-inch pieces
3 oz. (3/4 cup) shredded Cheddar cheese
1/4 cup finely chopped green onions (4 medium)

1) Heat oven to 350°F. Spray 11x7- or 12x8-inch (2-quart) glass baking dish with cooking spray. In large bowl, beat egg and milk with wire whisk until smooth.

2) Separate dough into 8 biscuits; cut each into quarters. Gently stir biscuit pieces into egg mixture to coat evenly. Fold in bacon, cheese and onions. Spoon mixture into sprayed dish; arrange biscuit pieces in single layer.

3) Bake at 350°F. for 23 to 28 minutes or until golden brown. Cut into squares.

2 things I changed: I used about 6 pieces of regular bacon, just cooked it up then crumbled into the mixture and I didn't use green onion. I just wasn't in the mood for them :)

The original recipe is found here!

Linking up with the first ever Pinned It, Made It! Check out more Pins that folks have tried out this week!


Wednesday, July 18, 2012

Bacon Pancake Sticks


I saw these recently on Pinterest, right here .

The original recipe calls for egg, which I don't know why, my pancake batter doesn't call for egg so I didn't add it.

All you need is cooked bacon. I like to cook mine in the oven, doesn't shrink up as much. Pancake mix. Mix your pancake batter up accordingly. A hot skillet/griddle. Once your bacon is cooked, drain and place on griddle. Pour pancake batter, slowly along the top of the bacon until the bacon is completely covered. Cook like you normally do a pancake, then flip it. Serve with some syrup for dipping. My kids liked this one, even the hubby did!

Friday, June 29, 2012

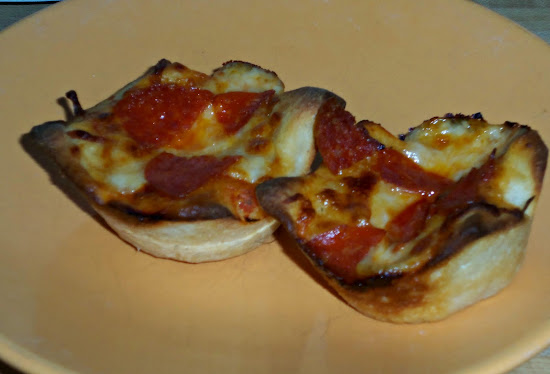
Muffin Tin Pizzas


I saw this recently on Pinterest and added it to the lunch menu this week for the kids. Just took it out for a test drive today and they devoured it. I didn't try them, I opted for a Greek Turkey Wrap that I had seen on there as well, which was pretty yummy! The kids though really liked these little pizzas and isn't that what's really important?!

**Please excuse my icky, stained up muffin tin. I do have a better one that I use strictly for muffins!**

Original recipe for these babies is right HERE
and here's what I did:

What You Need:
Refrigerated pizza dough
Pizza Sauce
Shredded Cheese
Pepperoni
Muffin tin (but I guess by what the original poster says mine is a "cupcake tin"....weren't these the original muffin tins until muffins became the size of a head?

Directions:
Preheat oven to 425 degrees (as the package directed) and grease the muffin tin. I used Pam, generously. I laid the dough out and cut into 12 equal pieces and sat in the tin holes and pressed and tried to evenly get the sides up over the top, some did, some didn't, but it seemed ok in the end so don't stress!

Then I spread a spoon of pizza sauce to cover the dough and filled with cheese. I used shredded moz. Then topped with pepperoni. I couldn't find the small circles of pep so I just cut mine into quarters. Then pop into the oven at 450 and cook for 10-12 minutes!

*Oops, just noticed after c/p'ing this from the original recipe that the oven was only supposed to be 425. I went 450 for 12 and they turned out perfect. I could have probably went one less minute or so.*


Monday, June 25, 2012

Framed Maps


I saw this idea and thought it was cool, especially since we've lived in a few places around the country. My husband was cleaning some of his drawers out in the bedroom and tossed an old map book so I thought it was perfect time to do this project which only cost me about 8 bucks in frames.

I decided on doing 5x7's and went to good ol' WalMart and purchased cheapy frames that were less than 2 bucks a piece. Got home, traced my map locales to fit the frames, cut and framed. Then I noticed I bought frames without the hangy things. (that's what I get for being cheap). So I had to improvise and hooked some twine to them to hang.

I like the way they turned out. I'm not very good at hanging pictures straight so I went for a mix-up look so hopefully you can't tell they are crooked. They look straight to me, but that's my problem I always have with hanging stuff. It always looks straight to me, not to others lol.

Monday, June 4, 2012

Trisha Yearwood's Key Lime Cake


I love, love, LOVE Trisha Yearwood's cooking show on Food Network. I believe it's called Trisha Yearwood's Southern Kitchen, off the top of my head, without googling! Anyways, I love a recipe with a back story and this show has it! In fact, all my favorite cook books are those with stories/histories attached with the recipes. I might not even try the recipes out but I sure love a good family story to go with it if I do! I caught this recipe on her "Family Reunion" show this weekend and had to whip it up ASAP....also I will have to try out her daddy's bbq chicken (which was also featured) one day this week.

When we lived in Georgia, we'd drive through her beautiful hometown of Monticello when headed for the lake. I'll have to dig up some pictures!

Now back to cake business...here's the recipe and beware, it's dangerously delicious!


Key Lime Cake
Recipe adapted from Home Cooking with Trisha Yearwood (c) Clarkson Potter 2010

Prep Time:20 minInactive Prep Time:15 minCook Time:40 min
Level:
Easy
Serves:
12 servings
Ingredients
Cake:

Butter, for greasing pan
Flour, for dusting pan
One 3-ounce package lime flavored gelatin
1 1/3 cups granulated sugar
2 cups sifted all-purpose flour
1/2 teaspoon salt
1 teaspoon baking powder
1 teaspoon baking soda
1 1/2 cups vegetable oil
3/4 cup orange juice
1 tablespoon lemon juice
1/2 teaspoon vanilla extract
5 large eggs, slightly beaten
Glaze:

1/2 cup key lime juice (from about 25 small key limes or 4 large regular limes)
1/2 cup confectioners' sugar
Icing:

1/2 cup (1 stick butter), room temperature
One 8-ounce package cream cheese, room temperature
One 1 pound box confectioners' sugar
Directions
For the cake: Preheat the oven to 350 degrees F and grease and flour one 9-by-12-by-2-inch cake pan.

In a large mixing bowl, mix the gelatin, granulated sugar, flour, salt, baking powder and baking soda. Stir to mix well. Add the oil, orange juice, lemon juice, vanilla, and eggs. Mix until well combined. Pour the batter evenly in the pan and bake for 35 to 40 minutes. Test for doneness by lightly touching the tops or inserting a toothpick. Cool the cake in the pan for 5 minutes then turn out onto a cooling rack.

For the glaze: While the cake is still hot, mix the lime juice and confectioners' sugar together well. Pierce the cake with a fork to allow the glaze to soak in better and pour it over the cake on the cooling rack. Allow cake to cool completely as you prepare the icing.

For the icing: Cream the butter and cream cheese. Beat in the confectioners' sugar until mixture is smooth and easy to spread. Spread the icing on the top and sides of the cake.

Cook's Note: you can also use three 9-inch round cake pans and make this into a layer cake.

Wednesday, February 22, 2012

Not-So-Traditional Beignets

Yesterday for Fat Tuesday I decided that it would be fun to let the boys help me make Beignets. Of course I got this fab idea late in the afternoon and didn't have time or patience to work with actual yeast and rising so I saw on Sandra Lee's website something similar, using refrigerated biscuit dough (what, refrigerated biscuit dough?)...yes, that's what I said and I know that this isn't a traditional Beignet recipe, hence the title but hey, it was quite quick and I had the stuff on hand to make it and my kids loved them in the end so isn't that really all that matters?

The stuff you need:

2 cans refrigerated biscuit dough
some oil, fill a saucepan about half full
powdered sugar

What you do:

Heat oil in the pan at about medium heat
Have your helpers cut the biscuits into quarters
Place a few pieces of biscuit dough into the pan and fry till golden

Place on pan to kinda drain the grease and then have your helpers shake them in containers with powdered sugar or a brown paper bag would work excellent for this process but I didn't have one


Then place on a plate and eat!


(sorry about the horrible quality pics, not a clue what my camera was set on!)

Tuesday, February 7, 2012

Chicken Gyros


Of course I saw this on Pinterest and couldn't wait to try it. I love a good Gyros and I REALLY love a good Tzatziki sauce and both of these were superb if I do say so myself! Everyone here were big fans, including my super picky husband(it's not so much that he's picky, he just thinks he's the only one who can really cook in the house) but with this dinner he went on and on about how good this was!

So here ya go!

Tzatziki sauce:
1 cup plain Greek yogurt
1 regular cucumber, peeled and seeded
1 teaspoon minced garlic
1 teaspoon white wine vinegar
Salt and pepper
Squeeze of fresh lemon juice
Extra virgin olive oil

For the chicken:
2 teaspoons minced garlic
Juice of 1 lemon (2-3 Tablespoons)
2 teaspoons red wine vinegar
2 Tablespoons extra virgin olive oil
2 heaping Tablespoons plain Greek yogurt
1 Tablespoon dried oregano
Salt and pepper
1 1/4 lbs. boneless, skinless chicken breasts

To assemble: Pita bread
Fresh tomatoes, seeded and diced
Red onion, sliced thin

Directions:
Shred the cucumber or chop in food processor. Wrap in a towel a squeeze to remove as much water as possible. Mix together the yogurt, shredded cucumber, garlic, white wine vinegar, salt and pepper to taste, and lemon juice. Drizzle lightly with olive oil.

Refrigerate for at least 30 minutes before serving to allow the flavors to meld.

To prepare the chicken, combine the garlic, lemon juice, red wine vinegar, olive oil, yogurt, oregano, and salt and pepper to taste in a medium bowl. Whisk together until mixed well. Add the chicken pieces to the bowl and mix well to coat. Cover and refrigerate for about 1 hour.

Cook the chicken as desired, either in the skillet or with the broiler. Once the chicken is completely cooked through, transfer to a plate and let rest for 5 minutes. Cut into strips. Heat pitas. Top with chicken, tzatziki sauce, diced tomatoes and sliced onions. Serve immediately.

You can find the recipe here at The Girl Who Ate Everything .

*******************************

On a side note...I'm not a fan of the pita pockets but that's all I can ever find around here until the last time I went shopping I noticed that they had a new pita in town, a whole wheat pita, without the pocket. I found them at my WalMart right next to the yucky pita pockets. These were super! I don't remember the brand name and unfortunately they are gone now, we ate them all, that's how good they were!

*******************************

On another side note....Have you seen those Milky Way cookies on Pinterest? Yeah, well I did and I pinned them to my "sweets" board and told my twin boys to pick out a couple of desserts the last time I went grocery shopping. One picked the Milky Way cookies and we tried them....I must say they were a big let down. Nobody in my house was crazy about them. The most I got, from the twins was a "yeah, their kinda good"...my older son picked out the Milky Way pieces and left the cookie portion....needless to say we won't try them again, unless I find a good cookie dough to try...the dough just wasn't all that...or maybe I just messed it up ha! Anyways, next on our list of sweets to try are the homemade Twix bars....I'll let you know!

********************************

And one more side note....do you know how I remember the difference in spelling desert and dessert? A teacher taught me this WAY back in elementary school....a desert only has sand so it gets 1 S and a dessert has sugar and spice so it gets 2 S's! I still use that brilliance to this day when I spell either!

Sunday, January 29, 2012

The BEST Spanish Rice

I found this recipe a couple years back on a blog. I had looked for years and years for a great Spanish Rice recipe that was restaurant quality and was so excited when I found this, this is it! This is the ONLY Spanish Rice I make now and last night while making it I had to look up the blog for the recipe and my husband was surprised that I didn't have it written down somewhere (ha). I was a little worried though because this time it did take a couple of searches to find it and so I must put it here where it's easier for me to get to, and what if the author of the recipe deletes her blog the next time I want to make it? OH NO!


And here is the recipe for this yummo rice.....

Restaurant Spanish Rice
ingredients


3 tablespoons vegetable oil
1 cup uncooked long-grain rice
1 teaspoon garlic salt
1/2 teaspoon ground cumin
1/4 cup chopped onion
1/2 cup tomato sauce
2 cups chicken broth  (I use 2 chicken bouillon cubes with 2 cups of water) 


Directions:


Heat oil in a large saucepan over medium heat and add rice. Cook, stirring constantly, until puffed and golden. While rice is cooking, sprinkle with salt and cumin.
Stir in onions and cook until tender. Stir in tomato sauce and chicken broth; bring to a boil. Reduce heat to low, cover and simmer for 20 to 25 minutes. Fluff with a fork.


and you can click the link below to go to the home of this great recipe!
Restaurant Style Spanish Rice  


And in other news....I just picked up my mother's old 1970's maple china hutch. I remember when we got  this as a kid and it  was in our house forever. My mom passed away earlier this month and my brother gave me her hutch. I want to re-do it, I've seen some great looking hutch makeovers. My husband doesn't think that is right, I guess he sees it as disrespectful. I don't. I just want to give it a little update.  I promised him I'd wait a couple of weeks before just diving into it.......but really my mind is made up and I can't wait to transform it into a piece I will just love....I mean it's still the same hutch on the inside right?

Tuesday, January 17, 2012

Apple Pie Crescents

This is the easiest little dessert and my kids love them, even my "non-liking pie" daughter!

 Pre-heat oven according to package
 2 packages of crescent rolls (I used 2 for my family of 6)
 1 large apple, sliced...you can peel it if you want, I just keep the peel on
 cinnamon/sugar
 melted butter

 roll out the crescent rolls onto a cookie sheet and spread with melted butter place a couple of apple slices along the wide end of the triangle. Sprinkle with cinnamon and sugar and then roll it up. spread a little more melted butter over the top and sprinkle with a little more cinnamon and sugar and then bake for about 10 minutes!

Monday, January 2, 2012

Dry Erase Frame

I was downstairs cleaning up the basement when I came across some frames I hadn't used yet so I was able to quickly complete this idea I saw on Pinterest (of course!). I took the frame, tore out a piece of notebook paper and I antiqued my paper up by blotting with my used coffee filter and let it dry. After it was dry, I put it in the frame and there you go, a dry erase marker board! Now that the holidays are over I am looking forward to completing more projects :)